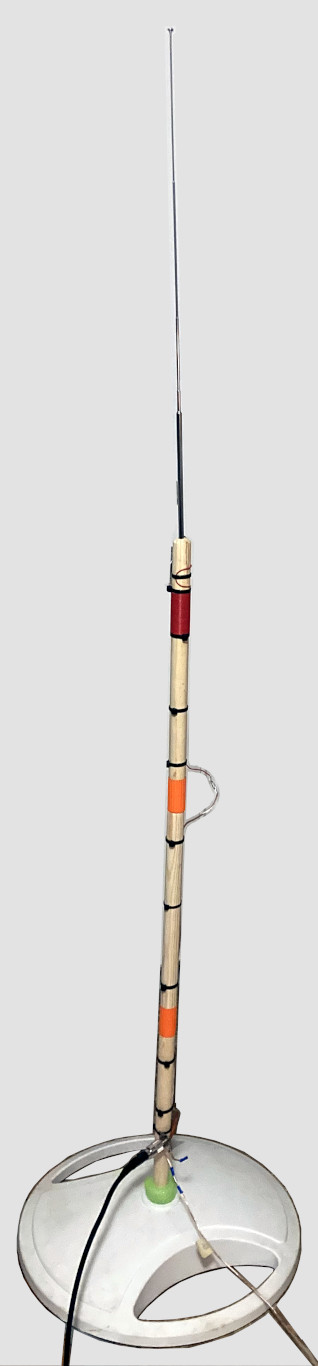
The Paint-Pole Antenna
Yes, the base is from a fan and yes that's part of a pool noodle
Larger images are available by right-clicking them and choosing Open image in new tab or similar.
Sometimes being a 'DIY' amateur radio operator can be frustrating, especially when you have almost no budget for it. Yes, amateur radio is important and can be a life-saver in emergency situations, but blessings, offerings, food, house payments, car repairs and clothing come first.
I do the best I can with the resources I have. Do I need some coax? I remove some unused cable-TV
coax from off of the house or check my container full of old wires. Do I need a portable 20-meter
portable vertical antenna? No, I don't buy one, I (try to) make it!
![]()

I've wanted to try operating portable from a park or other location but just don't have any suitable antennas. I've watched Thomas (K4SWL) for some time as he does his POTA (Parks On The Air) activations and was intrigued that he could make decent contacts with a relatively small antenna, in particular the Elecraft AX1. Noting that it was mostly just a whip with some loading coils, I started to seriously contemplate how to make such a thing myself.
First and foremost, I want to say that God gave the idea for this antenna from a YouTube video by 'Sam'. In the video Sam describes how he built a 20 and 40 meter portable vertical antenna by coiling speaker wire around a wooden paint pole sold at Walmart. Thankfully Sam gave a detailed description of the antenna build in the video description.
Off the bat, I tried to order the paint pole from Walmart but they weren't available. I thought maybe they were discontinued so I left a comment on Sam's YouTube video asking what the pole diameter was. Unfortunately after a month or so, he didn't respond to my comments so I put the project on hold until I could figure it out myself. Thankfully I revisited his video some time later and tried the Walmart paint pole link again and this time around it was available. Yay!
Here is most of Sam's video description regarding the antenna (lightly edited)...
Sam, if you object to this being here, please let me know and I'll remove it
" Hi all, here's a super-brief build guide for a portable antenna. I've had
good contacts using 5 watts on CW from OK to AZ, CT, and OH (20 meters) and AZ, WY, KY (on 40
meters). It's 6-7 feet tall and tunes very well to both 20 and 40 meters (with the 40-meter
extension). It has a fairly narrow bandwidth but is perfect for the CW portion of the band, and can be
easily tuned by adjusting the telescoping whip:
So the backbone of this antenna is the only thing I had to buy, a 42" extension pole for $4 locally
from Walmart. You'll need two of these for the 40-meter extension. I didn't take pictures as I went,
but this should give you a good idea of what I did (and please ask if you have any questions!). Here's
the link: https://www.walmart.com/ip/PaintPro-M...
1. I found the rabbit ears antenna that came with my RTL-SDR kit. I took one of the 3-foot telescoping
elements out, and also took out the screw on connector. I soldered the connector to the end of a
super-long strand of speaker wire (18 gauge is what I had handy).
2. I then drilled out a shallow hole at the top of the pole, enough to fit the whip connector in and
have the top (where the antenna base sits) just above the pole. I then hot glued it to secure the
telescoping element.
3. I then wound about 25 turns of the wire on the topmost section of pole, assembled the rest of the
pole, and temporarily ran the rest of the wire to the base of the pole. I cut two wires of 13 feet
each as the 20-meter counterpoise. I took a piece of coax with the "raw" end (no connector) used
alligator clips to temporarily connect the main element (connected to the coil and the whip) to the
center of the coax, and the counterpoise wires to the shield. I then hooked the other side of the coax
up to an SWR meter of some kind. A nanoVNA paid for itself on this project!
4. Fire the nanoVNA up and realized that things worked for 20 meters (you need to get this band right
first)! but that my SWR frequency was much too high. This means I had to add turns to the coil
(conversely if it was too low I would remove turns). I kept doing this until I was right around 14 mHz
with the antenna fully extended. For me this was 48 turns, but ymmv. Actually, tuning with the antenna
a little shorter might give you some tunable wiggle room later on, which is what I ended up doing.
There is always a little variation in whereever I set up, and as I don't have a tuner it's nice to
just have to adjust the whip. I almost had a 1:1 match here.
5. Once it's good you can put on the finishing touches and button it all up. I cut the wire between
the top and middle section, and the middle and bottom sections. Ensuring I had enough slack I soldered
on butt connectors to attach the wire on assembly. I soldered the main element to a BNC connector at
the base. And then I made two pigtails for the counterpoises that are attached the BNC connector and
have butt connectors for the wire (which have the other end of the connectors). I then used ample
amounts of the stretchy sealant tape and electrical tape, whatever I had, to secure everything to the
pole.
6. Then try it out! I extend the counterpoises in opposite directions, sort of aimed in the direction
that I want to contact. Adjust the whip to get a good SWR. The worst case scenario is that you have to
add or subtract turns of wire, so maybe hold off on the tape until you're sure you like it.. Also, I
had to make a but of an ugly choke by winding some coax around a cheap clip-on ferrite, and this
helped with any stray RF that was making my QCX mad.
7. For 40 meters! This is a bit easier, because you are just winding a bunch of wire around an
additional section (from an additional pole kit, but then you have extras in case). This section goes
underneath the one with the 20 meter coil, so you'll have 4 sections total. I wound the wire 99 times.
To adjust I put the antenna together, and this was easier because the coax is hooked up. Just trim the
wire, recoil, etc. and then alligator click or whatever to the rest of the wire until you get a good
match. Also, lengthen the counterpoise wires before you tune the coils. I made these 33 feet long, so
I just cut two additional 20 feet sections, added but connectors, and you can attach these to the 20
meter counterpoise wires when needed. I was able to get the SWR down to about 1.5:1 with no tuner.
That's it! For mounting options I've had lots of luck with a tiki torch stake, and it all sort of fits
together. One can also use a clamp to clamp the stake/antenna to a fence or table. It's a bit fiddly
in tuning, so always probably a good idea to have some kind of SWR indicator handy when setting up.
" - Sam
After ordering the very inexpensive paint pole kits, I went ahead and tried making this antenna with some left-over speaker wire. Frustration soon followed as I could not get the SWR anywhere near where it should be despite following Sam's instructions and giving myself what I thought was adequate wiggle-room. To be honest, this is often how my homebrew projects end up...try something seen elsewhere and it almost never works -- even after trying over and over.
After taking a little break, I decided to try using some door-bell wire for the coil instead of
speaker wire and wound many extra turns just to give myself a wide margin of error. I don't like
wasting anything, but since I don't have an inductance meter handy and don't really trust
online air-core calculators, I would unwind a couple of turns of wire, cut it off, then test the
antenna on my semi-functional antenna analyzer, rinse, repeat. To my amazement, I eventually got
really close to 1.3-to-1 SWR after removing about twenty turns. Yeah, stinks that I had to waste that
much wire, but now my son has some extra wires to use in his
Electronics Playground.
![]()
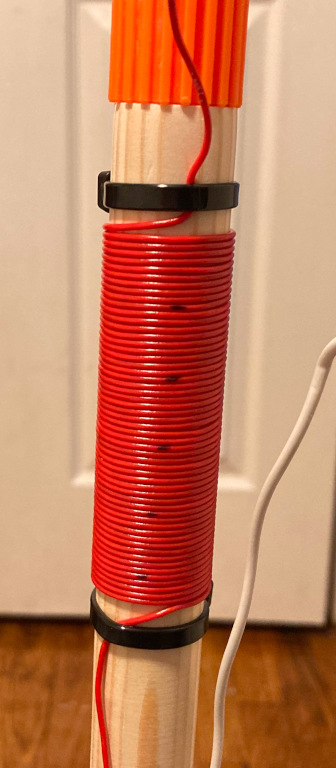
So -- for 20 meters -- it ended up being about forty turns of door-bell wire around the top section of the paint-pole. Then to fine-tune the SWR I adjusted the length of the 42-inch telescoping whip. You can really get your steps in from walking back and forth from the antenna to the analyzer but the best SWR I've been able to get is about 1.09-to-1 -- not bad!
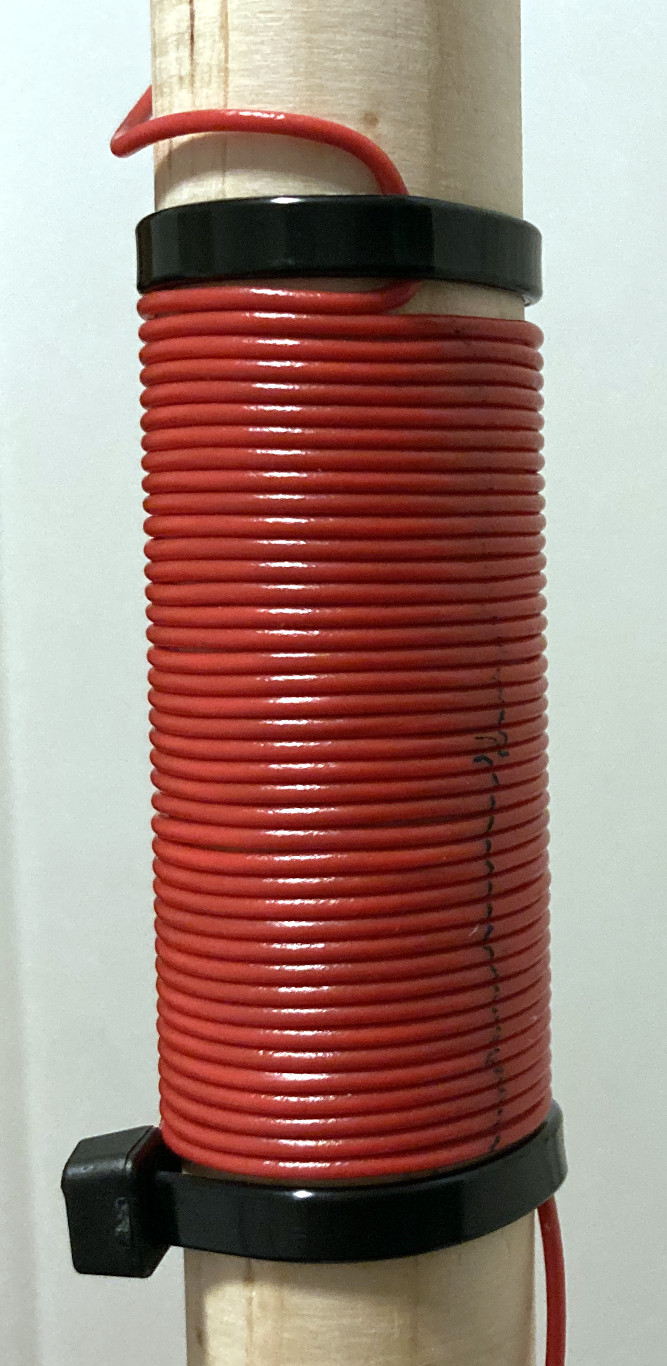
Coil detail
You can see where I used a pen to count the turns
Top view
Yes, I drilled the hole for the whip crooked. I don't have a drill-press
While I built this antenna to support two radials, I have only put one on so far. It seems to be fine for now because last night I finally got to use this antenna for the first time and was blown away when I saw my Reverse Beacon Network results...
RBN results map from first test
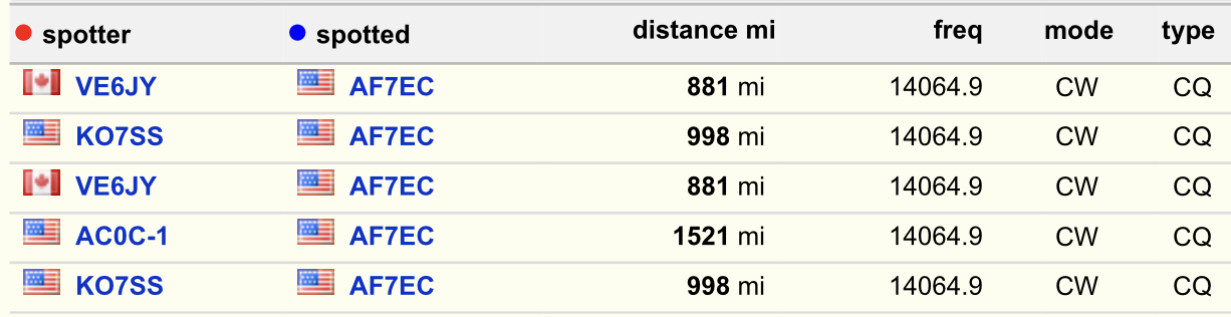
RBN results from first test
I'm still a little shocked that I almost made it half-way across the U.S.! My main antenna, my homebrew random-wire, hasn't been able to get anywhere near that distance. I think part of the issue is that this paint-pole antenna is resonant on 20 meters and the random-wire is non-resonant and needs an antenna tuner.
Before I saw my RBN results, I sat there and called CQ for what seems like thirty minutes. No one answered, so I really was beginning to wonder if my signal was even leaving the confines of my house. I'm so glad to know that this thing actually works!
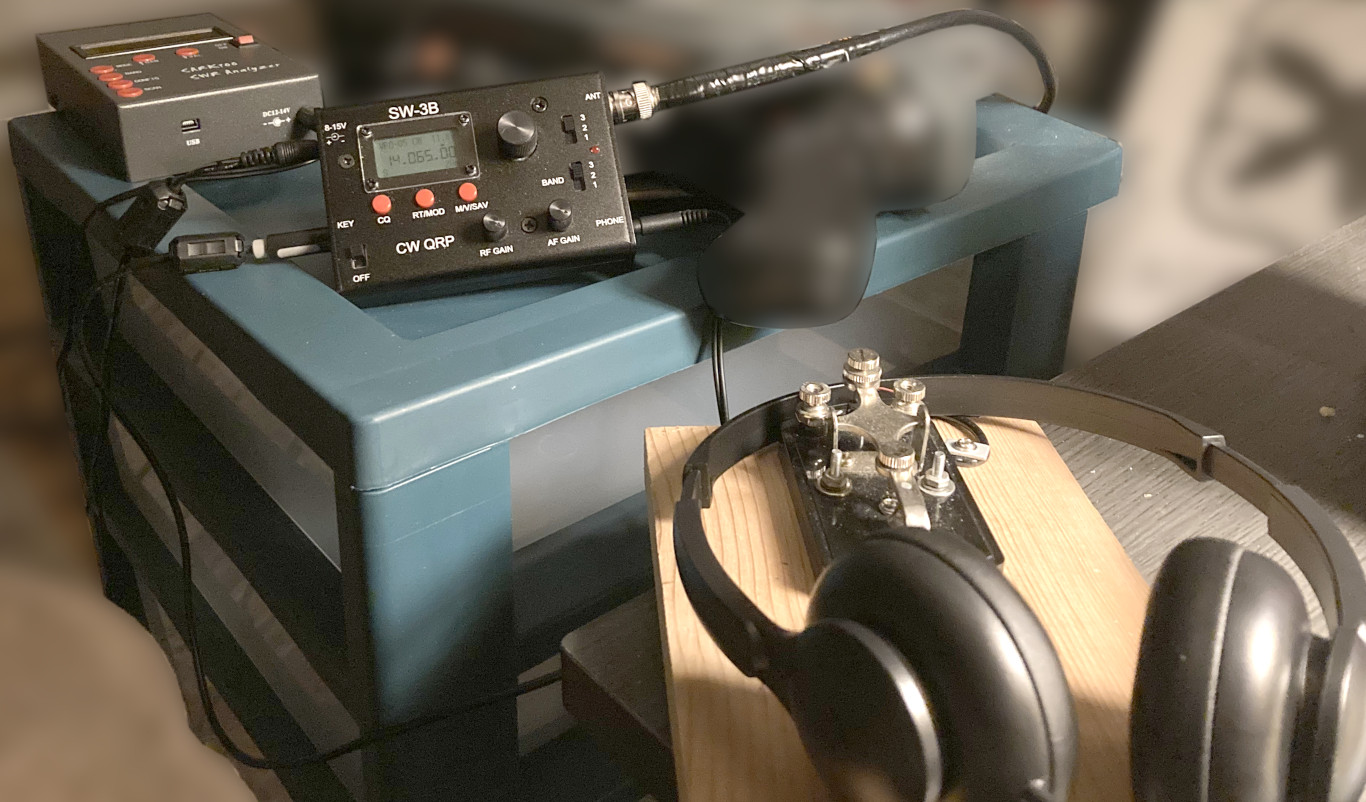
Operating position during first test
No, that's not a blurred-out gun, it's a toy that blasts salt at gnats and flies
Antenna dimensions
So you don't have to wait for me to reply to you, here are the dimensions of my particular
paint-pole set and whip. Measurements are as accurate as I could get -- sorry for any
inaccuracies...
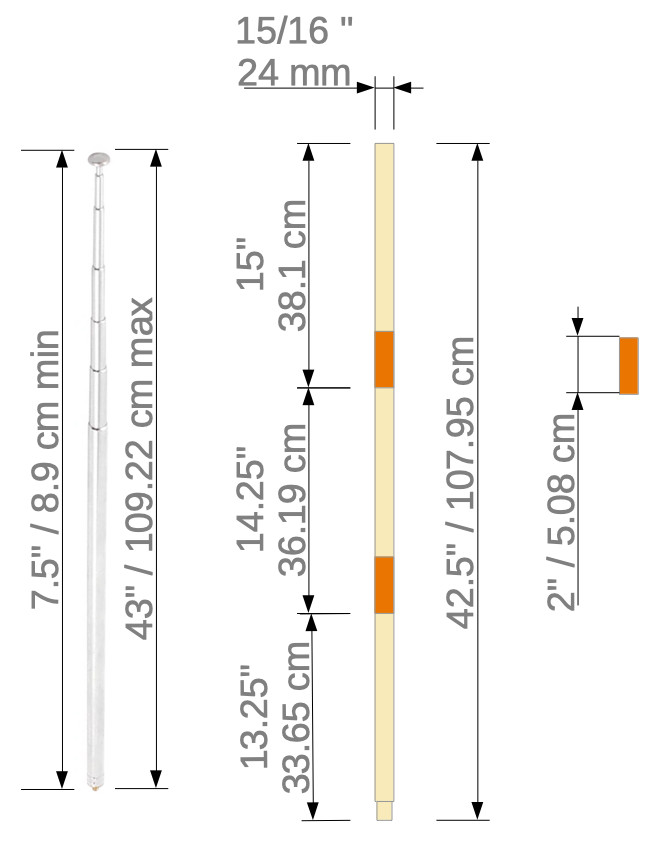
Antenna dimensions
(textual dimensions are below)
(please forgive any metric inaccuracies - machine converted)
Overall pole height (without whip): 42.5 inches / 107.95 cm
Pole diameter: 15/16 inch / 24 mm
Top pole section height: 15 inches / 38.1 cm
Middle section height: 14.25 inches / 36.19 cm
Bottom section height: 13.25 inches / 33.65 cm
Whip min height: 7.5 inches / 8.95 cm
Whip max height: 43 inches / 109.22 cm
Whip min diameter: 1/16 inch / 2 mm
Whip max diameter: 7/32 inch / 6.5 mm
Plastic section coupler height: 2 inches / 5.08 cm
20 meter coil: ~40 turns / 20 AWG / ~0.100 inch / ~0.8118 mm doorbell wire
40 meter coil: ~54 turns / 20 AWG / ~0.100 inch / ~0.8118 mm doorbell wire
Radials each: 14 MHz: ~16 foot / ~4.8 m, 7 MHz: ~33 foot / ~10.05 m speaker wire
Other details
Besides the difference of door-bell wire instead of Sam's speaker wire, I did not wrap
my antenna in electrical tape -- at least not yet. Also Sam used butt connectors while
I am temporarily using male + female spade connectors. The spade connectors have already
broken off a few times, so I'm planning to go with either good quality alligator clips or
maybe banana connectors. I did not solder the connectors, only crimped them,
so they're probably just cheap and cutting the wire when crimped.
The whip has a small screw at the base of it, but I chose not to use that due to how flimsy it looked. Instead I'm just using a crude 'shove the whip into a hole' method. Essentially I ran a sturdy solid copper wire along the side of the drilled hole on top of the paint pole, then the wire exits a smaller hole farther down. I just push the whip in as far as it can go and the copper wire makes good contact with it.
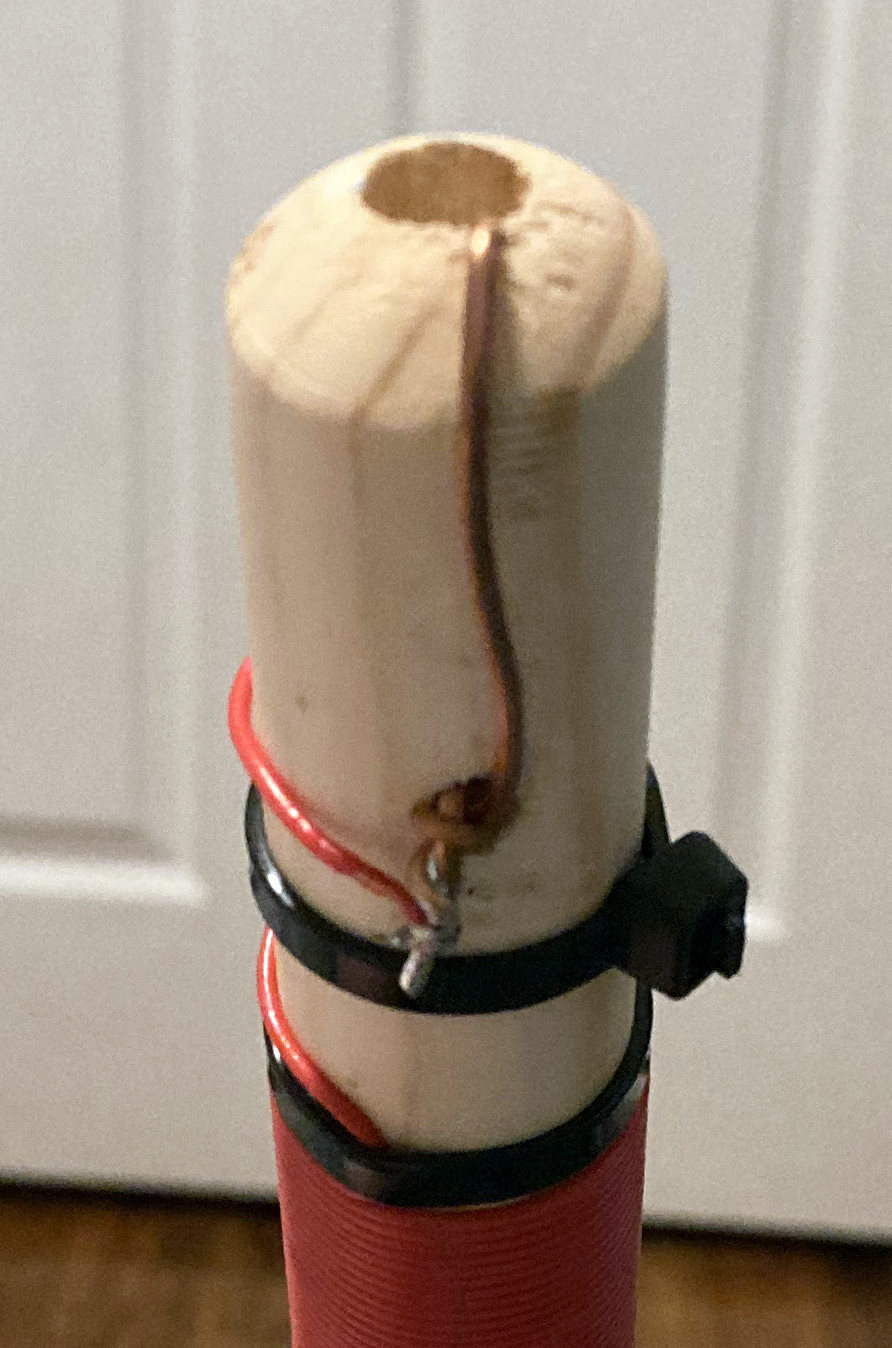
Top side detail
The solid copper wire makes contact with the whip inside the drilled hole
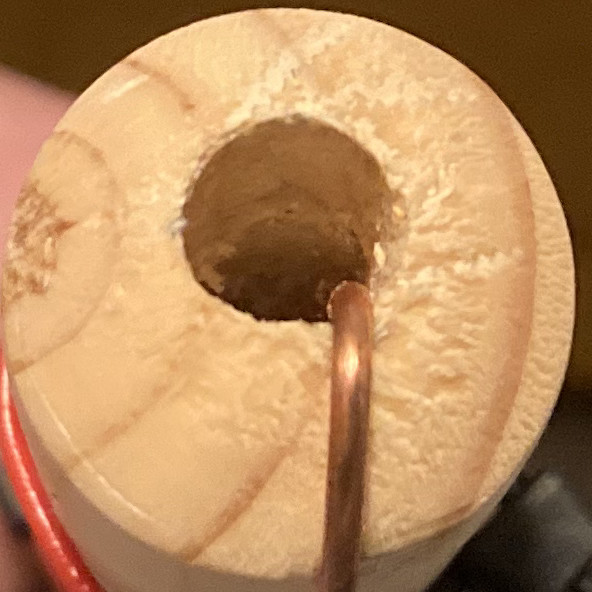
Top top detail
The solid copper wire makes contact with the whip inside the drilled hole
Sam also built a 40 meter coil that you could swap into the center section, and I plan to do that too -- I just haven't had the opportunity yet. My car was broken down for nearly one and a half years after I was hit with long covid, so I was working hard to get that repaired before most other projects. I will update this post if / when I get around to the 40 meter coil.
For a base, Sam used a tiki torch spike for outdoor use. We didn't have those available nearby but instead Walmart had a fishing-pole holder. It's essentially a sturdy coil with a straight piece that pushes down into the dirt, then the paint-pole fits inside the sturdy coil. The one I got strangely had a flat surface where it's supposed to push into the dirt, so I may try to grind it into a point instead. For an indoors stand, I am temporarily using the base of an old pedestal fan with a 'pool noodle' for spacing, although this will need to be re-engineered soon -- it is very unstable but is all I have to work with right now.
Glad I tried to make this!
I am very pleased with the results of this DIY / homebrew vertical antenna! While my version
is not as robust as Sam's, it seems like it's doing the job. I have not used it outdoors
yet as I don't have a good-enough battery to take into the field, but when the time is right and
budget allows, I'll get a suitable LiFePO4 battery and try some POTA or just plain field
operations!
![]()
40 meter update Added November 11, 2023
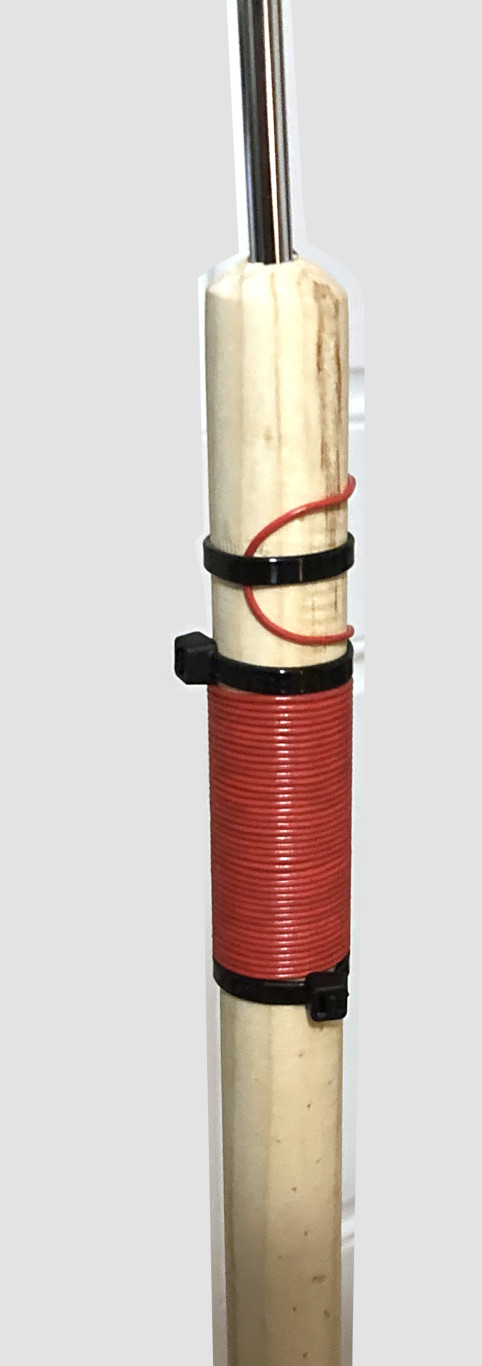
I finally got around to adding the 40 meter coil to this paint-pole antenna the other day. While I thought it would take 100+ turns, it actually ended up needing only around 54 turns. Just to be clear, for 40 meter operation, both the 40-turn 14 MHz coil plus the 54-turn 7 MHz coil must be used together in series. I wound the 40 meter coil on the middle section of the antenna. I also added a bypass wire used to completely bypass the 40 meter coil when I want to operate on 20 meters, that way I don't have to carry a separate fourth 'wire only' section for that purpose.
40 meter coil detail
The partially-visible white wire is the bypass wire for 20 meters
In addition to the 40 meter coil, I also beefed up the mounting of the SO-239 connector. Previously it was zip-tied to the bottom section of the antenna pole, which wasn't very robust and made it harder to screw in the coax's PL-259 connector. I ended up sacrificing a pen from the dollar store, cutting the white round body of it into two small pieces that would act as stand-offs. That way the wire coming out the back of the SO-239 would not be jammed against the paint pole, the assembly is now much more robust and it's easier to screw in the PL-256 connector of the coax.
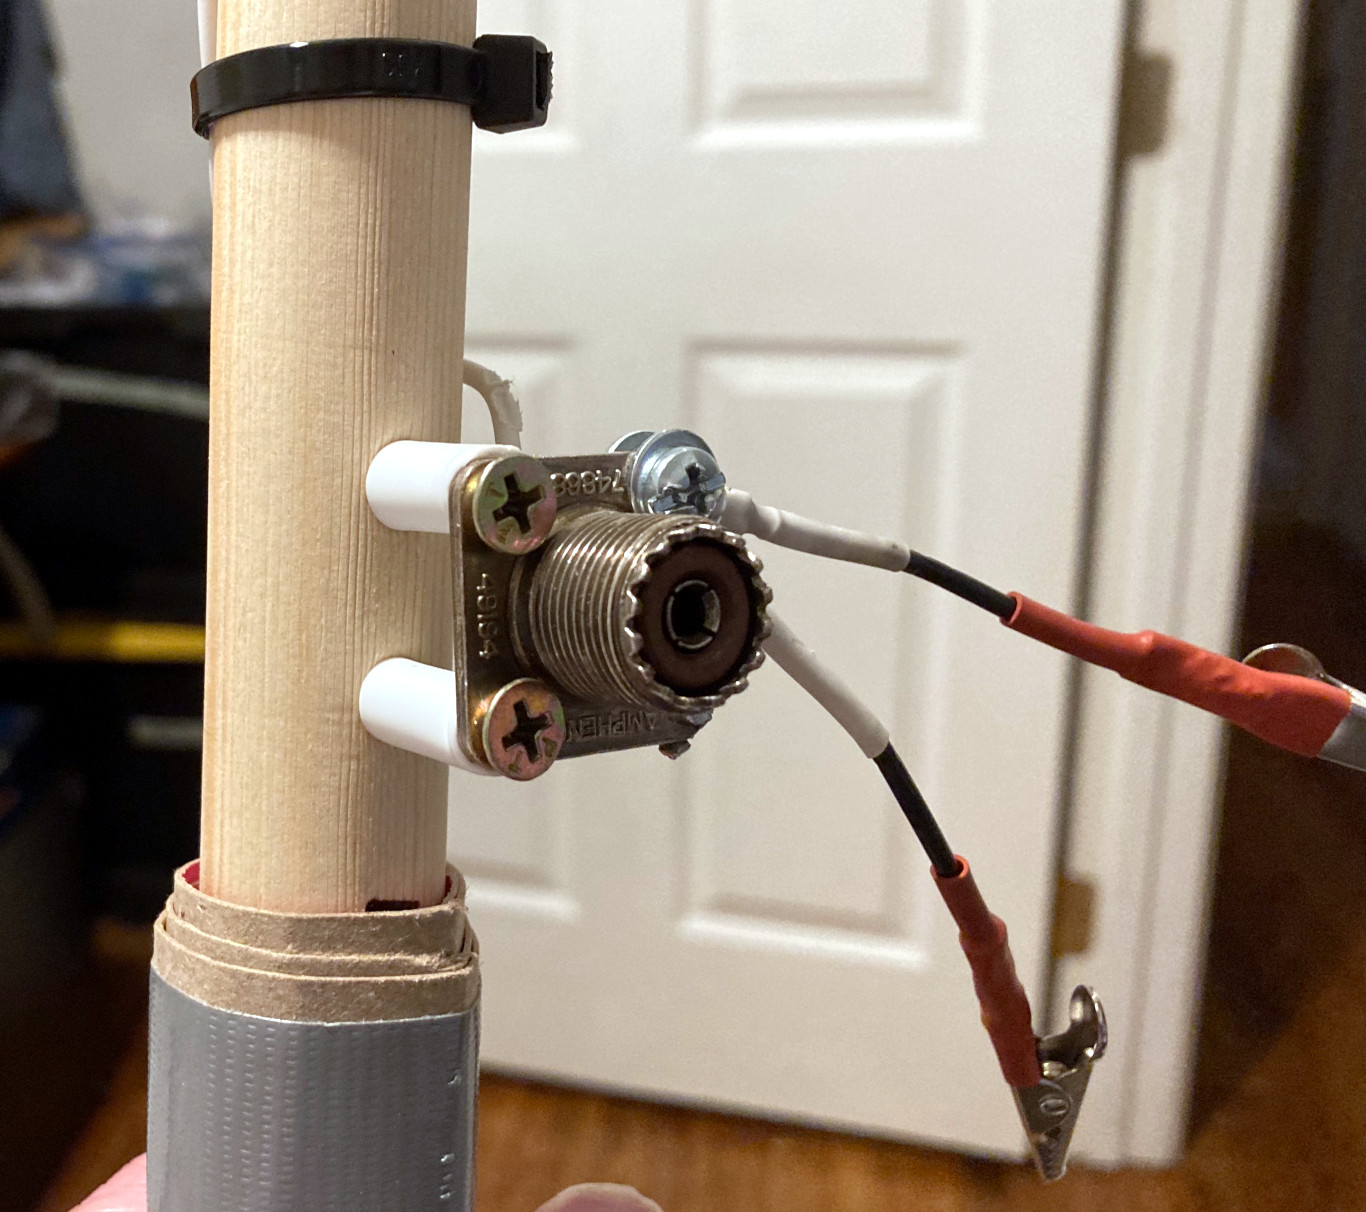
Updated SO-239 mounting
Also note the new radial / counterpoise connection scheme
I also revised the connection setup between the three pole sections. Before, I was using speaker wire and crimp-on connectors, but the speaker wire must have been some super-cheap stuff because the crimp-on connectors would fall off due to the speaker wire being so brittle. I found some vacuum-cleaner power cord wire and that was much more robust and easier to work with. I went with male banana plugs and good quality alligator clips instead, which seems to work well and requires less stress on the wires during connect and disconnect. I also had to replace the speaker wire coming from the SO-239 plug as it also was brittle and fell apart, again using vacuum-cleaner power wire. In fact, any speaker wire that was on the antenna was removed and replaced with the sturdy vacuum-cleaner power wire.
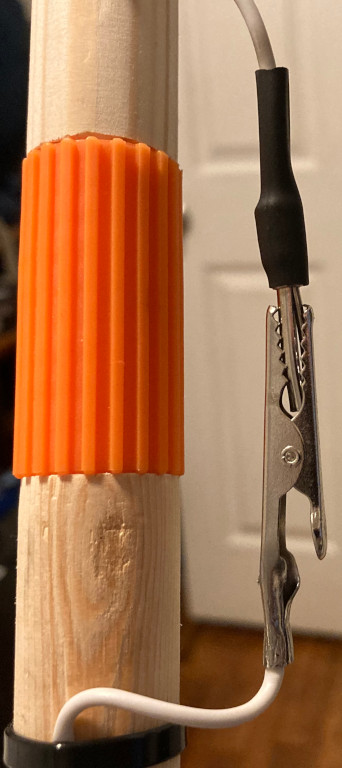
Updated section connections
Oops -- forgot the shrink-tubing on that alligator clip!
Lastly, I made the base mounting a little more robust. If you look carefully at the original mounting picture below, you'll see I initially used a shaved-down pool noodle to couple the antenna to the repurposed fan base. This obviously was not very stable and the antenna was constantly tipping over. I took some of the metal tubing that was part of the broken fan stand, cut it to around six or seven inches long, then pushed it firmly back into the base. For the antenna part, I still had to use 'country engineering' by wrapping a few layers of thin cardboard then duct-taped it to keep it wrapped tightly on the bottom section of the pole. Now the antenna is held firmly into the base, although it's still loose enough to pull out of the metal tubing, when necessary.

Original base mount
Who knew pool noodles were unstable??
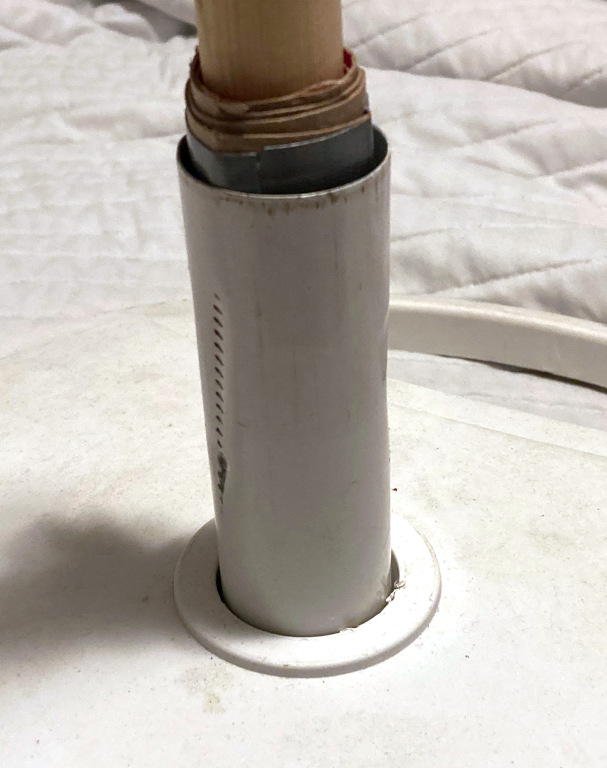
Updated base mounting
So long, pool noodle!
As mentioned in another article, when set up in my house, 40 meters operation wasn't all that exciting. I think this has more to do with the radial (only tried one) not being properly stretched out all the way and the limited choice of direction. Once it's less soggy outside, I'll take this out, use both radials and stretch them in a straight line.
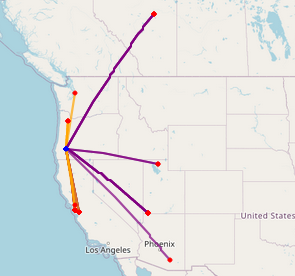
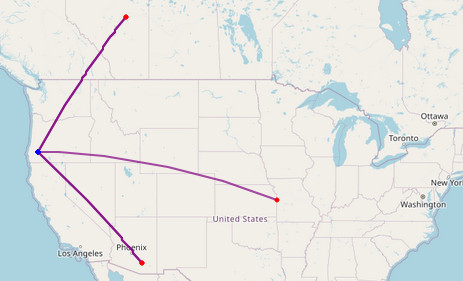
RBN map for 20 and 40 meter test
Orange is 40 meters, purple is 20 meters
Should I dare make a 30 meter coil now??
God bless you, and thank you for reading!
![]()
About me
First and foremost I'm a follower of Jesus Christ. After that, I'm a blessed husband,
father and grandfather. I do remote computer work for a living although it's mostly
part-time. I'm an amateur radio operator - AF7EC. When I'm not working on the endless
list of house and car projects, I like to tinker with electronics, like to listen to
shortwave radio and write software (mostly open-source) in C, C++, Python and Free
Pascal. I usually run Linux as my main operating system but sometimes I'm forced to
endure macOS and Windows 11 for gaming with my son or testing software. Overall, I am
a big nobody, but always willing to share about Jesus and all that God has done for me
and my family.
Comments
(No comments yet)